
Honeywell 4000 Installation Manual⁚ A Comprehensive Guide
This comprehensive guide provides detailed instructions for installing the Honeywell 4000 thermostat. It covers everything from pre-installation checks to advanced configuration. Proper installation ensures optimal performance and energy savings. Follow each step carefully for a seamless setup. This guide is your key to unlocking the full potential of your Honeywell 4000 thermostat.
The Honeywell 4000 thermostat is a programmable digital thermostat designed for basic comfort control and energy savings. It allows users to program different settings for weekdays and weekends‚ optimizing energy usage based on their schedules. The Honeywell 4000 series‚ including models like the TH4110D1007‚ are known for their ease of installation and user-friendly interface.
This thermostat typically supports 2 Heat/1 Cool stages for heat pump systems and offers 5-2 day (weekday/weekend) programmability. Its features include one-touch temperature control‚ which overrides the program schedule at any time‚ providing immediate adjustments for unexpected changes in comfort needs.
Before installation‚ it’s crucial to understand the thermostat’s capabilities and compatibility with your existing heating and cooling systems. The installation process involves mounting the unit on a wall using the provided UWP mounting system‚ making appropriate wiring connections‚ and configuring the thermostat through the Installer Setup (ISU) menu.
This manual will guide you through each step‚ ensuring a smooth and successful installation. The Honeywell 4000 thermostat offers a balance of simplicity and functionality‚ making it a popular choice for homeowners seeking reliable and efficient climate control.
Properly installed and configured‚ the Honeywell 4000 can significantly contribute to energy conservation and enhanced home comfort.
Identifying Your Specific Honeywell 4000 Model
Before commencing the installation process‚ it’s essential to accurately identify your specific Honeywell 4000 thermostat model. This identification ensures you’re referencing the correct installation instructions and wiring diagrams. Different models within the Honeywell 4000 series may have slight variations in their features‚ wiring configurations‚ and programming options.
Typically‚ the model number can be found on the thermostat itself‚ often located on the back or side of the unit‚ or sometimes behind the faceplate. Look for a label or sticker that clearly displays the model number‚ which usually consists of a combination of letters and numbers‚ such as TH4110D1007.
Once you’ve located the model number‚ cross-reference it with the documentation included in the product packaging or on the Honeywell website. This verification step ensures that you’re using the appropriate installation manual and any model-specific addenda.
Understanding the specific features and capabilities of your particular Honeywell 4000 model will help you navigate the installation and setup process more effectively. If you have any doubts‚ consult the Honeywell support resources or contact a qualified technician for assistance.
Misidentifying your thermostat model could lead to incorrect wiring or programming‚ potentially causing damage to your HVAC system or preventing the thermostat from functioning correctly. Therefore‚ taking the time to confirm your model number is a crucial first step.
Pre-Installation Checklist and Preparation
Prior to installing your Honeywell 4000 thermostat‚ meticulous preparation is crucial for a smooth and successful process. Begin by gathering all necessary tools‚ including a screwdriver (both Phillips and flathead)‚ wire stripper‚ level‚ drill with appropriate drill bits‚ and a voltage tester. Ensure your work area is well-lit and free from obstructions.
Next‚ turn off the power to your HVAC system at the breaker box or switch. This step is paramount to prevent electrical shock during wiring; Use a voltage tester to confirm that the power is indeed off before proceeding. Safety should always be the top priority.
Carefully remove your old thermostat from the wall‚ labeling each wire with masking tape and a marker to indicate its corresponding terminal. Take a photograph of the existing wiring configuration as a reference. This documentation can be invaluable if you encounter any confusion during the new installation.
Inspect the existing wiring for any damage or corrosion. If you find any‚ replace the affected wires before connecting them to the new thermostat. Ensure the wires are clean and properly stripped to provide a secure connection.
Finally‚ review the Honeywell 4000 installation manual thoroughly. Familiarize yourself with the wiring diagrams‚ terminal designations‚ and setup procedures specific to your model. Having a clear understanding of the process beforehand will save you time and prevent potential errors.
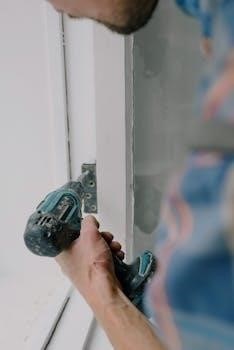
UWP Mounting System Installation
The Honeywell 4000 utilizes the UWP (Universal Wall Plate) mounting system‚ designed for simplified installation. Before starting‚ ensure the power to your HVAC system is turned off at the breaker. Open the thermostat package and locate the UWP; it is a crucial component for securing the thermostat to the wall.
Position the UWP on the wall at the desired location‚ ensuring it is level. Use a level tool to achieve accurate alignment. Once leveled‚ carefully mark the positions for the mounting screws through the designated holes on the UWP. These markings will guide you in drilling the pilot holes.
Using a drill with an appropriately sized drill bit‚ create pilot holes at the marked locations. If you are mounting the UWP on drywall‚ consider using wall anchors to provide additional support and prevent the screws from stripping. Insert the wall anchors into the pilot holes.
Align the UWP with the pilot holes and secure it to the wall using the provided screws. Tighten the screws until the UWP is firmly attached‚ but avoid over-tightening‚ which could damage the wall or the UWP itself. Double-check that the UWP remains level after tightening the screws.
With the UWP securely mounted‚ you are now ready to proceed with the wiring connections. Refer to the wiring diagrams in the installation manual to ensure correct connections.
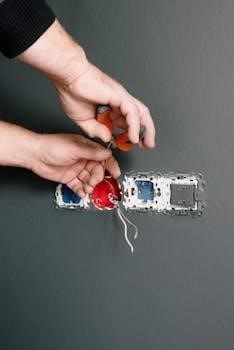
Wiring Connections and Terminal Designations
Proper wiring is crucial for the Honeywell 4000 thermostat to function correctly. Before connecting any wires‚ double-check that the power to the HVAC system is turned off at the breaker. Identify the existing wires connected to your old thermostat‚ noting their colors and terminal designations. Common terminal designations include R‚ W‚ Y‚ G‚ C‚ and others‚ depending on your system type.
The Honeywell 4000 uses industry-standard terminal designations. The R terminal is typically for the 24VAC power supply‚ W for heating‚ Y for cooling‚ G for the fan‚ and C for the common wire (if present). Carefully match the wires from your HVAC system to the corresponding terminals on the UWP mounting plate.
When connecting the wires‚ ensure that each wire is securely inserted into its designated terminal. Use a small screwdriver to tighten the terminal screws‚ securing the wires in place. Avoid stripping too much insulation from the wires‚ as exposed wire could cause shorts.
If your system uses a C wire‚ it is highly recommended to connect it for optimal performance and to prevent potential issues with battery life. If you do not have a C wire‚ you may need to install one or use a compatible alternative solution.
After connecting all the wires‚ double-check each connection to ensure they are secure and properly seated. Refer to the wiring diagrams provided in the installation manual for specific configurations based on your HVAC system type.
Power Options and Wiring Diagrams
The Honeywell 4000 thermostat offers flexible power options to accommodate various HVAC system configurations. Primarily‚ it can be powered by 24VAC from the HVAC system transformer‚ typically connected to the R and C terminals. The C terminal‚ or common wire‚ is essential for consistent power and optimal performance. If a C wire isn’t available‚ the thermostat can operate on battery power alone‚ but this isn’t recommended for long-term use.
Wiring diagrams are critical for proper installation‚ showing how to connect the thermostat to different types of heating and cooling systems. Diagrams vary based on whether you have a conventional system (furnace and air conditioner) or a heat pump system. Heat pump systems often have additional wires for reversing valves and auxiliary heat‚ requiring specific wiring configurations.
Refer to the installation manual for detailed wiring diagrams that match your specific HVAC system. These diagrams illustrate the correct terminal connections for each wire‚ ensuring accurate and safe installation. Incorrect wiring can damage the thermostat or the HVAC equipment‚ so careful attention to these diagrams is essential.
For systems without a C wire‚ consider using a C-wire adapter kit‚ which allows you to repurpose an unused wire or install a new wire to provide the necessary common connection. Always disconnect power before making any wiring changes.
Installer Setup (ISU) and Configuration
The Installer Setup (ISU) menu on the Honeywell 4000 thermostat allows technicians to configure the device to match the specific heating and cooling system installed in the home. Accessing the ISU is typically done by pressing and holding specific buttons on the thermostat for a few seconds‚ as detailed in the installation manual. Once in the ISU‚ various parameters can be adjusted to optimize performance.
Key configurations include setting the system type (e.g.‚ conventional furnace‚ heat pump)‚ the number of heating and cooling stages‚ and the temperature swing or cycle rate. Adjusting the system type ensures the thermostat operates correctly with the connected equipment. Setting the correct number of stages optimizes energy efficiency and comfort by matching the thermostat’s output to the system’s capabilities.
The temperature swing‚ also known as the differential‚ determines how much the temperature can vary from the setpoint before the thermostat activates the heating or cooling system. A smaller swing provides more consistent temperatures‚ while a larger swing can save energy. Proper ISU configuration is essential for achieving both comfort and energy savings. Consult the Honeywell 4000 installation manual for the specific ISU parameters and their recommended settings for your system.
Advanced Setup Options
The Honeywell 4000 series thermostat offers advanced setup options that allow for further customization beyond the basic installer settings. These options provide greater control over the thermostat’s behavior and can be tailored to specific user preferences and system requirements. Accessing these settings typically involves navigating through the Installer Setup (ISU) menu.
One common advanced setup option is adjusting the backlight settings. Users can often customize the backlight intensity and duration to suit their viewing preferences. Another option is setting up temperature limits. These limits prevent the thermostat from being set too high or too low‚ which can save energy and prevent damage to the HVAC system.
Some Honeywell 4000 models also offer advanced fan control settings. These settings allow users to specify how the fan operates during heating and cooling cycles. For example‚ the fan can be set to run continuously for improved air circulation or to cycle on and off with the heating or cooling system to maximize energy efficiency. Proper configuration of these advanced settings can enhance comfort and reduce energy consumption. Refer to the Honeywell 4000 installation manual for detailed instructions on accessing and configuring these options.
System Operation Settings

Configuring the system operation settings on your Honeywell 4000 thermostat is crucial for ensuring it functions correctly with your specific heating and cooling system. These settings define how the thermostat interacts with your furnace‚ air conditioner‚ or heat pump‚ dictating when and how they activate to maintain your desired temperature.
One of the primary settings is the system mode‚ which typically includes options like “Heat‚” “Cool‚” and “Off.” Selecting the appropriate mode ensures the thermostat activates the correct heating or cooling components. Another important setting is the fan operation mode‚ which allows you to choose whether the fan runs continuously or only during heating or cooling cycles. Selecting “Auto” typically runs the fan only when heating or cooling is active‚ while “On” keeps the fan running continuously for constant air circulation.
For heat pump systems‚ additional settings may be available‚ such as the auxiliary heat control. This setting determines when the auxiliary heat source is activated to supplement the heat pump during colder temperatures. Incorrect settings can lead to inefficient operation or discomfort. Always consult the Honeywell 4000 installation manual to understand the specific system operation settings available on your model and how to configure them correctly for your HVAC system.
Troubleshooting Common Installation Issues
Even with careful adherence to the installation manual‚ encountering issues during the Honeywell 4000 thermostat installation is not uncommon. One frequent problem is the thermostat failing to power on. Begin by verifying the power supply; ensure the breaker is on and the wiring connections are secure‚ particularly the R and C wires‚ if applicable. If batteries are used‚ confirm they are fresh and correctly installed.
Another common issue involves incorrect temperature readings or the system not responding to thermostat commands. Double-check the wiring against the wiring diagrams in the manual to ensure each wire is connected to the correct terminal. Also‚ verify that the installer setup (ISU) settings are correctly configured to match your specific HVAC system type. Incorrect ISU settings can prevent the thermostat from communicating properly with your equipment.
If the heating or cooling system cycles on and off too frequently‚ adjust the cycle rate or differential settings within the ISU. Consulting the manual for recommended settings based on your system is vital. If problems persist after troubleshooting‚ consider contacting a qualified HVAC technician for assistance. They can diagnose and resolve more complex issues that may arise during or after installation.
User Guide and Operating Instructions

Once your Honeywell 4000 thermostat is correctly installed‚ understanding its operation is essential for maximizing comfort and energy savings. This section provides a user-friendly guide to the thermostat’s features and functions. Start by familiarizing yourself with the display and buttons; The display shows the current temperature‚ set temperature‚ and system mode (heat‚ cool‚ or off).
The primary function is setting the desired temperature. Use the up and down arrow buttons to adjust the setpoint. To change the system mode‚ locate the system switch and select the appropriate setting. The Honeywell 4000 offers programmable scheduling‚ enabling you to set different temperatures for various times of the day and days of the week.
Programming can typically be customized for weekdays and weekends separately. Refer to the thermostat’s programming menu for detailed instructions. Additionally‚ many models feature a “hold” function‚ which allows you to override the programmed schedule and maintain a constant temperature indefinitely. Explore the thermostat’s advanced settings for features such as adaptive intelligent recovery‚ which learns how long it takes to heat or cool your home and adjusts the start time of heating or cooling cycles accordingly. Understanding these functions will allow you to effectively manage your home’s climate.
Maintenance and Battery Replacement
To ensure the continued reliable operation of your Honeywell 4000 thermostat‚ regular maintenance is required. This section outlines the steps necessary to keep your thermostat in top condition‚ including battery replacement when needed. The most common maintenance task is cleaning the thermostat. Dust and debris can accumulate on the thermostat’s surface‚ affecting its accuracy and performance. Use a soft‚ dry cloth to gently wipe the thermostat’s screen and housing. Avoid using liquids or harsh chemicals‚ as these can damage the thermostat.
Many Honeywell 4000 models are battery-powered. The thermostat will display a low battery warning when the batteries need replacement. It is recommended to replace the batteries immediately when this warning appears to prevent the thermostat from losing its settings or failing to operate. To replace the batteries‚ locate the battery compartment‚ usually on the front or side of the thermostat. Open the compartment and remove the old batteries. Insert new AA alkaline batteries‚ ensuring they are correctly oriented according to the polarity markings inside the compartment.
Close the battery compartment securely. After replacing the batteries‚ verify that the thermostat is functioning correctly and displaying the correct time and temperature. Regularly check the thermostat’s display for any error messages or unusual behavior. Promptly address any issues to maintain optimal performance and prevent potential problems.